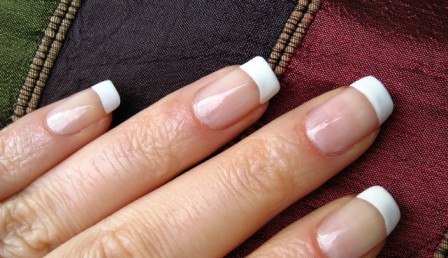
Creating the perfect French manicure at home can be both rewarding and cost-effective. Known for its classic, elegant look, the French manicure features a pale pink base with white tips, making it a versatile choice for both everyday wear and special occasions. Achieving salon-quality French nails at home might seem daunting at first, but with the right tools, techniques, and a bit of practice, anyone can master this timeless nail style. In this comprehensive guide, we’ll walk you through every step of the process, from preparation to the finishing touches, ensuring you have all the knowledge and tips you need to create beautiful French nails on your own.
Step 1: Gather Your Supplies
Before you start, make sure you have all the necessary supplies. Here’s a checklist:
- Nail polish remover
- Cotton balls or pads
- Nail clippers
- Nail file
- Buffing block
- Cuticle pusher
- Cuticle oil or cream
- Base coat
- Pale pink or nude nail polish
- White nail polish for the tips
- Top coat
- French manicure stickers or tape (optional)
- Cleanup brush or a small paintbrush (optional)
Step 2: Prepare Your Nails
Clean and Shape
Begin by removing any old nail polish with nail polish remover and a cotton ball. Next, clip your nails to your desired length. Remember, the classic French manicure often features slightly longer nails, allowing for a more pronounced white tip. File your nails into your preferred shape; a slightly rounded or square tip works well for French manicures. Use a buffing block to gently smooth the surface of your nails, which will help the polish adhere better.
Cuticle Care
Apply cuticle oil or cream to your cuticles and gently push them back with a cuticle pusher. This step is crucial for achieving a clean, professional look. Avoid cutting your cuticles, as this can lead to infection.
Step 3: Lay the Foundation
Base Coat
Apply a clear base coat to protect your nails and improve the longevity of your manicure. Allow it to dry completely. This layer also prevents the nail polish from staining your nails.
Apply the Pink Polish
Choose a pale pink or nude polish for the base color. Apply a thin, even layer of polish, starting from the base of your nail and working your way up in smooth, even strokes. Be sure to cover the entire nail but avoid flooding the cuticle area. Allow the first coat to dry, then apply a second coat if necessary for full coverage. Wait for it to dry completely before moving on to the tips.
Step 4: Painting the Tips
Freehand Technique
If you have a steady hand, you can paint the white tips freehand. Wipe off excess polish from the brush on the rim of the bottle for more control. Gently swipe the brush across the tip of your nail in one smooth motion. If you prefer a curved tip, follow the natural curve of your nail’s edge.
Using Stickers or Tape
For those who find painting freehand challenging, French manicure stickers or tape can be very helpful. Place them just below where you want the white tip to begin, ensuring they are firmly pressed down to avoid polish seeping underneath. Apply the white polish over the tip, then carefully remove the sticker or tape while the polish is still wet to achieve a clean line.
Cleanup
Dip a cleanup brush or a small paintbrush in nail polish remover to tidy up any smudges or irregular lines around the tips or cuticle area.
Step 5: Finishing Touches
Top Coat
Once your nails are completely dry, apply a clear top coat to seal in your manicure. This not only adds a glossy finish but also extends the wear of your nails. Be patient and allow ample time for the top coat to dry.
Cuticle Oil
Finish by massaging cuticle oil or cream around your nails and cuticles. This helps hydrate and nourish your nails and skin, giving your manicure a professional, pampered look.
Tips for Success
- Patience is key: Allow each layer to dry completely before applying the next. This prevents smudging and ensures a smooth, even finish.
- Thin coats: Apply thin layers of polish. Thick layers take longer to dry and are more prone to smudging or bubbling.
- Regular maintenance: To keep your French manicure looking its best, apply an additional top coat every few days. This will help prevent chipping and extend the life of your manicure.
- Practice: If you’re new to creating French tips, practice painting on a piece of paper or a nail wheel first. It helps to steady your hand and improve your technique.
Mastering the French manicure at home requires practice, patience, and a bit of creativity. By following these detailed steps and tips, you’ll be able to achieve a beautiful, salon-quality French manicure on your own. Not only does this allow you to customize your look to your exact preferences, but it’s also a fun and satisfying way to pamper yourself. So gather your supplies, and get ready to enjoy the timeless elegance of French nails, all from the comfort of your home.